GitLab Pages
How to deploy Lotus Docs on GitLab Pages
Overview
With GitLab Pages, you can publish your Lotus Docs themed site directly from a repository in GitLab.
- Use for any personal or business website.
- Native support for Hugo.
- Create websites for your projects, groups, or user account.
- Host your site on your own GitLab instance or on GitLab.com for free.
- Connect your custom domains and TLS certificates.
- Attribute any license to your content.
GitLab Pages makes it easy to build, deploy, and host your Lotus Docs website.
Prerequisites
Procedure
Use the following steps to get your Lotus Docs site up and running on GitLab Pages.
Create a new repo on GitLab e.g.
https://gitlab.com/colinwilson/colinwilson.gitlab.io. SelectGitLab Pagesas theProject deployment target: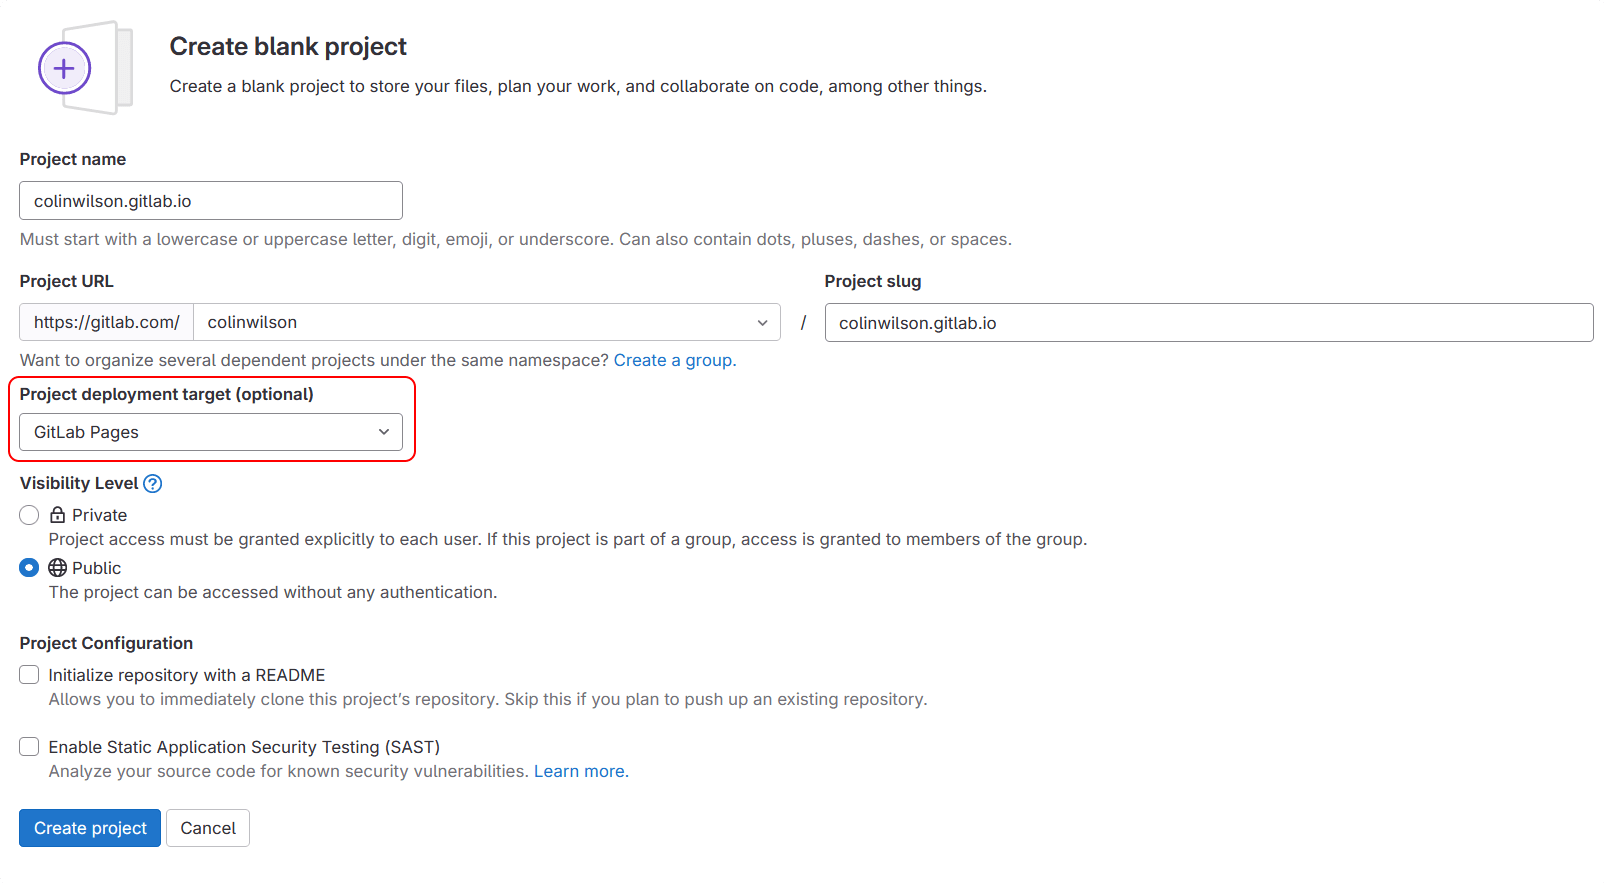
Create a new Hugo project using the
hugo newcommand:hugo new site colinwilson.gitlab.io && cd colinwilson.gitlab.ioInitialize your project as a Hugo Module using the hugo mod init command:
hugo mod init my-docs-siteUpdate your site’s config file (
hugo.toml/hugo.yaml/hugo.json) to include the required theme modules and update yourbaseURLto your intended GitLab Pages domain e.g.colinwilson.gitlab.io. You can also configure a[[menu.primary]]item. This creates a link on the landing page to thedocs/section.Refer to the quickstart guide if you wish install the Lotus Docs theme in a manner other than Hugo Modules (below).
Create some example content.
hugo new docs/example-page.mdUpdate the front matter
draftparameter in the createdexample-page.mdfile tofalse.--- title: "Example Page" date: 2023-08-25T23:36:29+01:00 draft: false ---Create an empty
.gitlab-ci.ymlfile at the root of your local repository./.gitlab-ci.amlCopy and paste the YAML below into the job file you created.
  image: registry.gitlab.com/pages/hugo/hugo_extended:0.140.2

variables:
  HUGO_ENV: production

default:
  tags:
    - docker
    - linux
  before_script:
    - apk add --no-cache go curl bash nodejs
    # - hugo mod get -u $THEME_URL
    ## Uncomment the following if you use PostCSS. See https://gohugo.io/hugo-pipes/postcss/
    #- npm install postcss postcss-cli autoprefixer

test:
  tags:
    - docker
    - linux
  script:
    - hugo
  rules:
    - if: $CI_COMMIT_REF_NAME != $CI_DEFAULT_BRANCH

pages:
  tags:
    - docker
    - linux
  script:
    - hugo
  artifacts:
    paths:
      - public
  rules:
    - if: $CI_COMMIT_REF_NAME == $CI_DEFAULT_BRANCH
Create a
.gitignorefile. Copy the contents below into it. This prevents your local/publicdirectory (and other resources) being committed to to your GitLab repository./public /assets/jsconfig.json resources/_gen/ .hugo_build.lockYour site structure should now look similar to the one below:
  colinwilson.gitlab.io/
  ├── archetypes/
  ├── assets/
  ├── content/
  │   └── docs/
  │       └── example-page.md
  ├── data/
  ├── i18n/
  ├── layouts/
  ├── static/
  ├── themes/
  ├── .gitignore
  ├── .gitlab-ci.yml
  ├── .hugo_build.lock
  ├── go.mod
  ├── go.sum
  └── hugo.toml
Use
git intto initialize your project as a repository, then commit all the changes to your local repository with a commit message of something like “🎉 initial commit”. Push your local repo to the repository you created on GitLab instep 1.Revisit your repository on GitLab, navigate to Build > Pipelines, and you should see that your Hugo site was successfully built.

- You should now be able to see your site at the
baseURL(e.g.https://colinwilson.gitlab.io) defined in yourhugo.toml/hugo.yaml/hugo.jsonconfig file
Last updated 26 Aug 2023, 15:36 +0100.